C'est la Vie is a 1966 Charlie Morgan 34.

Her home port is Everglades City, FL. Our typical cruising area is Southwest Florida, the Florida Keys, the Southeastern Atlantic Seaboard, and the Bahamas. We are C'est la Vie's third owners and purchased her in 2005. We continue to maintain and update this classic vessel. Please post any questions or comments about C'est la Vie or our travels via the comment links below.


Friday, September 21, 2012

Dual purpose tell tales on head sail

Seeking a break from the work in the engine compartment, I looked to the sails for a diversion.  We added a roller furling 130% genoa last fall and are very pleased with the increased performance and easy of use.


After using the sail for one winter, I realized two shortcomings.  First the only tell tales on the sail were aligned vertically with along the luff.  Unless the sail was fully extended no tell tales were visible.  When sailing to windward I rely heavily upon the forward sails tell tales to trim.  Secondly, with our roller furling sail there was no way to quickly judge the percentage of sail aloft.  "Did we unfurl a 80% jib or a %110 genny?"

With the sail off the foil for storm season the time is right to remedy the issues.  By strategically adding  tell tales I hope to  kill two birds with one stone.  C'est la Vie's "J" (the distance from her mast to forestay along the deck) is 184".  Thus the foot of a 100 percent sail on C'est la Vie would measure 184".  Each time we roll out or roll in 18.4" along the foot of our sail we are altering the sail area by 10%.  Ok this is Jeff logic so someone out there is welcome to correct me if my logic is flawed.

To provide an indication of the amount of sail out I placed new tell tales at 37" increments (18.4" x 2 = 36.8" rounded up)  back from the original tell tales along the luff of the sail.  This will allow us to estimate sail area via the tell tales placed at 20 percent intervals.

Fully unfurled equals 130%. Roll in to the next tell tale equals 110%.  Roll in halfway to the next tell tale and we have 100% aloft. Or perhaps more importantly if we roll out to the first tell tale we have a 70% head sail aloft. You get the idea?  I placed three new tell tales along the lowest level and two at the second tier.


Thursday, September 20, 2012

Success - C'est la Vie engine is out

With all the prep work completed yesterday, today was devoted to birthing the engine out the companion way then swinging it from the cockpit onto a pallet.  The yard has a fork lift so the pallet was resting at toe rail level just off the port side.

airborne engine.
According the the Beta Marine spec sheet the weight of our engine is approx 350 pounds.   I elected to use our main sheet vang, a 5 to 1 with 9/16" line, to do the primary lifting.

The engine moved off the beds on onto the cabin sole in the galley.
I also used our boom vang, a 5 to 1 with 3/8" line, to assist with some of the directional pulls.  Both of the block systems were secured to 2" webbing wrapped around the boom.  The main halyard was tied to the boom adjacent to the webbing to assist in supporting the load.

hanging midway through the the second lift while waiting on the fork lift
Using both system of blocks I managed to single hand the engine from the engine beds to galley sole.  Guiding and lifting the engine from the sole to the cockpit and then from the cockpit to the fork lift proved a three person job.

By lunchtime the engine rested on a pallet outside of C'est la Vie and a cavern full of needs remained inside.

The prop shaft is supported by 1" webbing hanging from the mounts for the fuel tank.
The water line from C'est la Vie flooding on the hard in 2004 is still visible in the engine room.   Cleaning and painting this area is definitely high on the priority list.

I have created a Picasa Album to record and share the our progress.  Please check it out via this link - Haul Engine Project - Fall 2012.


Wednesday, September 19, 2012

One damn engine mount nut

As of this evening the engine still resides atop the motor mounts in C'est la Vie's hull.  I have high hopes of having the engine out by this evening.  With a couple new ratcheting box end wrenches in hand the shaft coupling easily parted.  The engine mount bolts did not play as nicely
my nemesis the port side aft engine mount 
Removing the top nut required holding the threaded stud in place with a crescent wrench while turning the top nut with a 15/16 inch wrench.  I began saturating the nuts with PB Blaster two days ago.  For the two forward nuts the PB Blaster; a couple strikes with a cold chisel, and finagling the wrench into the correct position freed the nuts.  Freeing the starboard aft nut required all the the above plus the removal of the raw water strainer.  The port side aft mount proved to be my undoing.  All the previous tricks plus heat; a cheater pipe to provide more advantage, and three hours of effort on the wrench did not free the nut.  I finally turned my attention to the lag bolts attaching the mounts to the engine bed.  Each motor mount has two lag bolts these proved easy to remove.  Rather than spend my time on the engine mount nuts I should have simply removed the 8 lag bolts.

pile of parts growing under C'est la Vie

The pile of engine parts and accessories under C'est la Vie  continues to grow.  I started a Picasa Album to record the Haul Engine Project - fall 2012.  As the project progresses I will continue to add photos to the album.

Tuesday, September 18, 2012

Pulling C'est la Vie's Engine - the next project

That's right I'm pulling C'est la Vie's 34HP Beta Marine diesel engine out of the boat.  With just over a month left before we need to depart NC for FL the cooler weather has finally inspired me to get moving on pending boat projects.  I waffled between painting her decks or pulling the engine.  Pulling the engine won out due to three factors. First the proximity of Beta Marine's US headquarters located only 30 minutes away in Arapaho, NC. Secondly the local diesel mechanic, whom I trust, also owns a 1966 Morgan 34. And, finally painting this winter while in the water sounds much more rational than pulling the engine while sitting at the dock in Everglades City, FL.

What's the motivation for pulling our engine with only 2400 hours?  Well, here's the story.  Prior to purchasing C'est la Vie she rode out the 2004 hurricane season in Titusville, FL.  Three successive tropical storms pounded FL during the 2004 season.  These storms plugged C'est la Vie's cockpit scuppers with debris.  The rain water in the cockpit rose to a depth that allowed it to flow into the cabin.  By the time the flooding was discovered, I'm guessing a week, the water level in C'est la Vie's cabin was approximately 8" over the cabin sole.  This wreaked all manner of havoc on various internal systems & structures.  In the 7 years we have owned C'est la Vie much effort has gone into erasing all damage from and evidence of this sad chapter in her history.  The lower 8" of the motor sat in fresh water.  A transmission flush and a new starter motor brought the tough Beta Marine engine back to life in 2005, and she has served us well since that time.

When the temps began to dip last fall and winter I noticed a knocking sound in the hull when we started C'est la Vie's engine on cool days.  The knock would alleviate when the engine warmed up and ran smoothly.  I traced the source of the sound to the engine mounts.  The rubber vibration dampeners on the motor mounts are failing.  I'm guessing this is due in part to soaking for days in water and chemicals in 2005. Also the paint on portion of the engine that was submerged is peeling away.

If I'm going to lift the engine to replace the mounts then it might as well come all the way out for a coat or two a paint.  I'll also take advantage of the unfettered access to the engine compartment to do some house keeping.
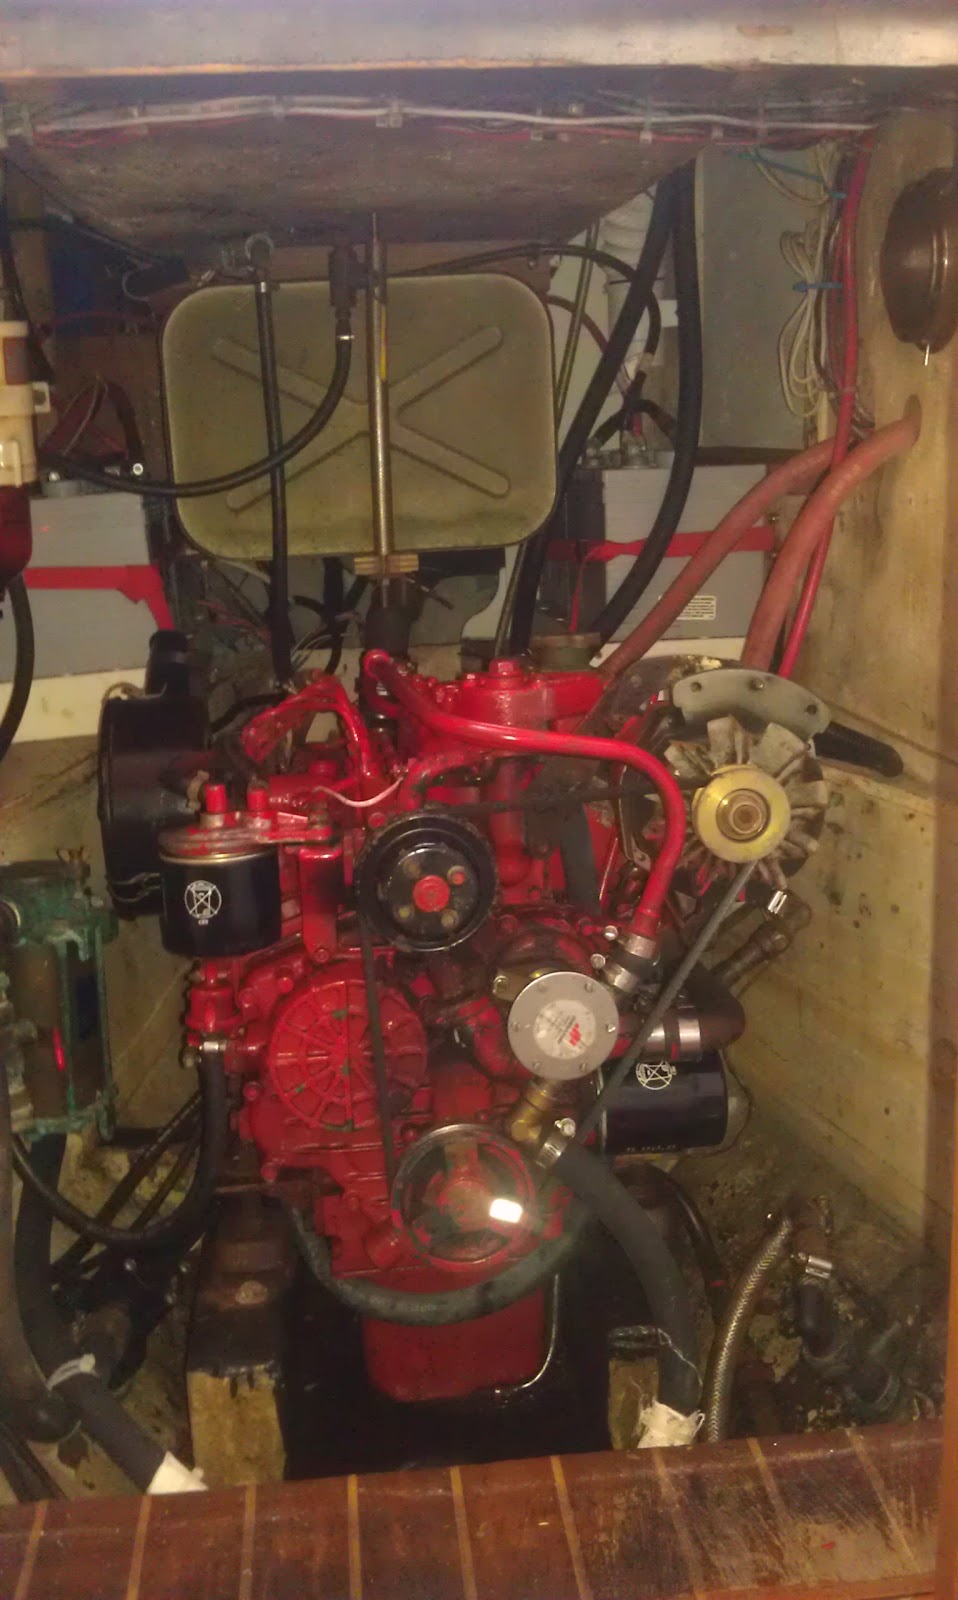
The starting point.

The alternator was the first to go.  Then, documenting as I went, off came hoses, wires, pipes, etc.  Four hours and 20 documented steps later only the exhaust  hose and the shaft linkage remained.  Struggling with the large diameter exhaust hose for 30 minutes convinced me that a hack saw was the best option, I plan to replace the hose anyway.  Thus the hose quickly fell.

The shaft linkage requires two 17mm open end wrenches and the motor mounts require two 15/16 open end wrenches.  Having only one of each wrench put the brakes on my progress for the day.   
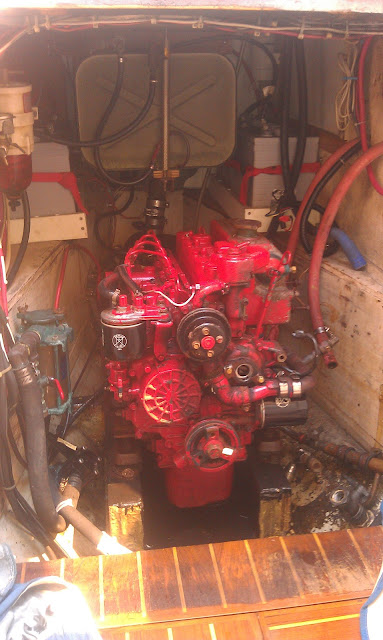
Only the shaft linkage and the mounting bolts remain
I'm now fully armed with the correct wrenches. The engine mount bolts are saturated with penetrating oil. Hopefully tomorrow I can free the engine from its bonds and lift it free of the boat.

Monday, September 17, 2012

Retired Main Sail Project Two - Tote Bags

Before launching into a description of my next effort to personally recycle our retired main sail with DIY projects, I'll put in another plug our friends at Ella Vickers.  In the past Ella has received C'est la Vie's retired sails.  Ella will give you credit towards purchases for your retired sails - Ella Vickers Sail Exchange.   My tote bags are a weak homage to the quality and creativity of Ella and her team.  Thanks for the inspiration and we will continue to send our retired sail cloth your way.

After completing the Paddle Board Bag (Paddle Board Bag Project - summer 2012), enough sail cloth remained that I was uncomfortable disposing of the material.  The remaining cloth included the M34 logo and the logo for the sail maker.  Using these two identifiable features I constructed two tote bags.


The smaller of the two bags served as a test run.  It is a simple 2-ply bag with no bells or whistles.  The size is a great fit for two stacked six packs of beverage cans, four wine bottles, or toting personal items from the boat to a marina shower.

With the first bag under my belt, I took a bit more time to lay out the second bag.  My plan was to capture the M34 logo on one side of the bag and place an exterior pocket on the other side.  The logo proved to be too big to fit on a reasonably sized tote bag.

materials cut for the large bag
 Before joining to outer and inner plys of the bag, I used a mesh cloth to create an inside pocket.  This pocket has a webbing loop on which to clip keys.


This bag is also constructed of two plys of sail cloth.  Once the two plys were joined, I then went to work on the outside components of the bag.
2 dimensional bag ready to be stitched into 3 dimensions
The exterior work began with the addition of a outer pocket that includes a grommet from a reef point as a drain hole.  Next the one half inch webbing carry straps were sewn in place.  Joining the edges and folding in the corners reminds me of gift wrapping presents only the scotch tape is replaced with stitches.  This work is completed with the bag inside out.  It is gratifying to flip the bag right-side out and find the layout works.


The final additions were a couple snaps along the top edge and a single snap on the exterior pocket.  This bag is large enough for an overnight bag.

Our main now lives on as a paddle board bag and two tote bags.