C'est la Vie is a 1966 Charlie Morgan 34.

Her home port is Everglades City, FL. Our typical cruising area is Southwest Florida, the Florida Keys, the Southeastern Atlantic Seaboard, and the Bahamas. We are C'est la Vie's third owners and purchased her in 2005. We continue to maintain and update this classic vessel. Please post any questions or comments about C'est la Vie or our travels via the comment links below.


Saturday, September 29, 2012

Refurbishing Engine Compartment and Bilge

Once the engine, batteries, decaying sound proofing, battery acid soaked shelf, a miasma of hoses, and a gallon of bilge muck were exorcised from C'est la Vie the engine compartment bilge lay bare.
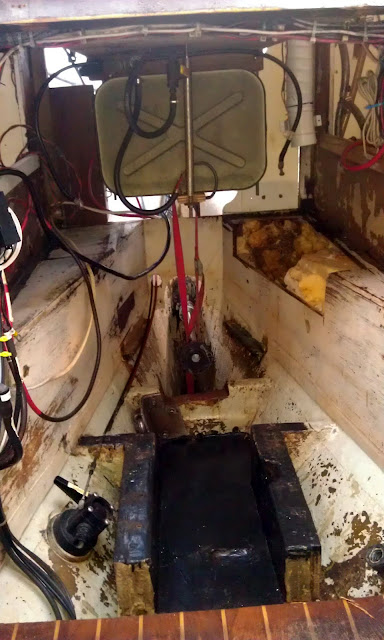
C'est la Vie's engine compartment and bilge laid bare
 The pie shaped shelves (right and left in the image above) are where we store the four, 6 volt batteries that make up our house bank.  The previous owner spilled battery acid on the port side shelf.  In an attempt to forestall the damage, we bathe the area in a baking soda solution about once a year.  Despite our efforts the 1/2" plywood in the effected area continued to decay. I removed the damaged section (on right in image above.).  The sound proofing panel in the area also suffered damage and is now gone.

 I constructed a replacement for the damaged shelf out of 1/2" plywood.
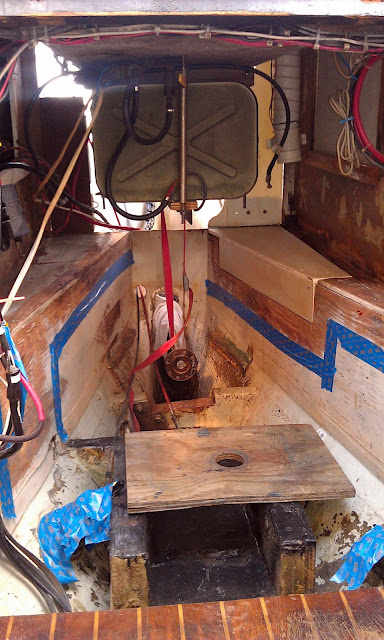
Test fit for shelf repair and prep for fiberglass
The base of the shelves are tabbed to the hull with  fiberglass mat.  Above the hull joint, bronze ring nails secured the joinery work in this part of C'est la Vie.  I'm using 4" wide fiberglass mat to secure the battery shelf repair so why not reinforce all the joints in the area with strip of mat.  This will make the entire assembly much stronger and hopefully add additional structural integrity to our already stout hull.

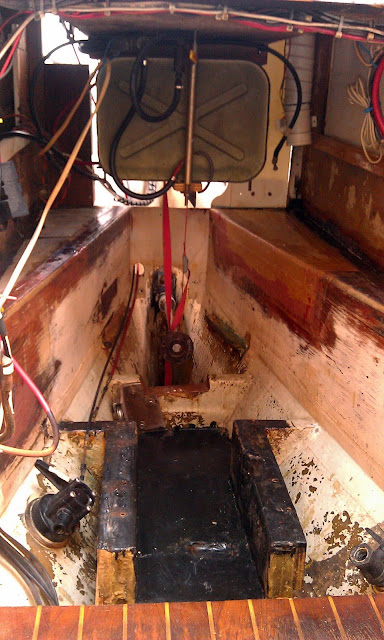
Along with the shelf repair the inside corners and outside corners of the shelves are now  reinforced with fiberglass mat.
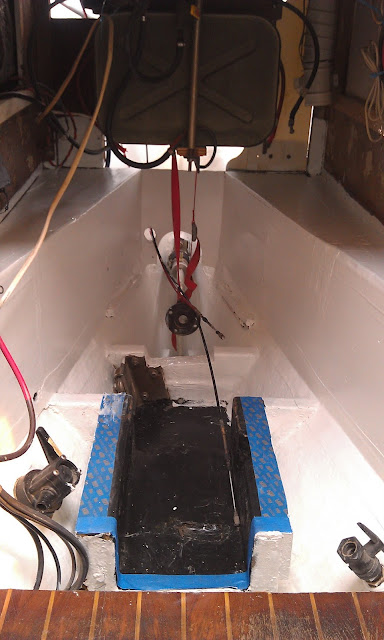
The next phase, sanding the lower engine compartment and bilge, put my meager contortionist skills to the the test.  I'm certain a future of squeezing into tiny boxes or passing my body through the head of a tennis racket is not in my future, but after hours of twisting and grunting the area is ready for a coat of primer.

The depths of the bilge with one coat of primer
To say I am pleased with the results would be an understatement.  From replacing  anchor rollers at the bow to varnishing the oar on the autopilot at the stern, almost every facet of C'est la Vie has received some attention during our seven years of ownership.  The exception was the engine compartment and bilge.  The daunting task of removing the engine to access the area proved too great a hurtle.  Now we have moved beyond the hurtle and I am pleased.

The engine compartment with two coats of primer
  Two coats of primer are done.  Two coats of bilge paint are forecast.  The next step will be to install new sound proofing panels on the walls.

Additional images of the progress are available via a web album dedicated to this project.  Here is the link to the album: Haul Engine - Fall 2012

Wednesday, September 26, 2012

Engine Haul-out week one progress report

One week ago C'est la Vie's Beta Marine engine left it's mounts and exited the vessel for the first time in over 15 years.  Progress on the engine is moving along in slow plodding steps.  Resting atop blocks and a pallet the engine took up residence along C'est la Vie's starboard side.

C'est la Vie with her engine resting along side.
The next step was to continue removing components that would be damaged by the pending de-greasing and power washing. I used tape to create labels for various connection.  I also took numerous images to serve as visual aids when I begin the reconstruction.
In the process of labeling and removing engine components prior to washing / de-greasing the engine

After washing and de-greasing, I went over the motor with a small wire brush in an effort to remove any lingering rust or flaking paint. To prevent future rust I applied Ospho to all the bare ferrous metal. The Ospho  dries to a black color.  The black areas in the image below clearly indicate were the metal had begun to oxidize.

ready for the first coat of new paint.
Through out this process I have left the oil and fuel filters in place to protect the orifices underneath.  The air intake, fuel pump attachment, and various other inlets are protected by tape.

first coat of paint on the engine.
The first coat of a paint went on thin to ensure the new paint and the old paint are compatible.  I'll now give the first coat 24 hours to dry.

Meanwhile inside the boat... I have reached a turning point in the battle of the bilge.   Everything is out of the boat and the area is clean.
C'est la Vie's engine compartment clean and vacant

Not it is time to begin re-installing, repairing, and upgrading.  Replacing port side plywood damaged  when the previous owner spilled battery acid is the next step.  Fresh paint and new sound proofing will soon follow.

Here is a link to the photo album documenting my progress - Haul Engine - Fall 2012  I will continue to add photos to the album as the project progresses.

Monday, September 24, 2012

industrial clean up in the engine compartment

The engine compartment and bilge continued to disgorge all manner of items for a day and a half after the engine cleared the boat.   First to go were essential items - fuel filter, water lift muffler, exhaust hoses, batteries, battery wiring, bilge pumps, bilge hoses, and so on.  Once these items were clear the old decaying sound proofing  succumb to hammer and scraper.

scrapping off decaying soundproofing material from the engine room walls
Working from the top down the job slowly pulled me towards the bilge.  Newly released from the pit were the bilge pump float switches.  I disassembled,  de-greased, and lubed the switches.
Upper and lower bilge pump switches cleaned.
The depths of the bilge continued to draw me down.  The effort began with gloved hands and a small plastic yogurt container.   I lay on my belly and scooped a pair of small pliers, a bungee cord, two pens, a crescent wrench, a couple of hose clamps, and a gallon of foul, black muck out of the bottom of the bilge.

a gallon of muck from the bilge

For the next round in the battle of the bilge I returned with a bottle of de-greaser and a scrub brush and began to clean the side walls of the bilge.  With batteries and bilge pumps gone all the water used to clean the bilge was sucked out via shop vac.

Please with the state of the lower bilge, I mixed up some Tri-sodium Phosphate (TSP) and began another top down wash of the engine compartment and bilge.  After rinsing copiously the water sucked from the bilge finally came up clear.