Once the engine, batteries, decaying sound proofing, battery acid soaked shelf, a miasma of hoses, and a gallon of bilge muck were exorcised from C'est la Vie the engine compartment bilge lay bare.
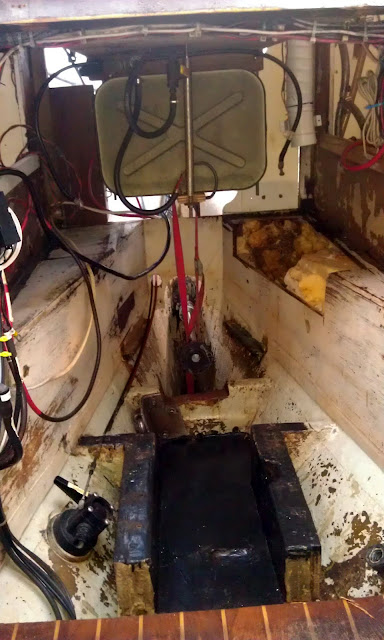 |
| C'est la Vie's engine compartment and bilge laid bare |
The pie shaped shelves (right and left in the image above) are where we store the four, 6 volt batteries that make up our house bank. The previous owner spilled battery acid on the port side shelf. In an attempt to forestall the damage, we bathe the area in a baking soda solution about once a year. Despite our efforts the 1/2" plywood in the effected area continued to decay. I removed the damaged section (on right in image above.). The sound proofing panel in the area also suffered damage and is now gone.
I constructed a replacement for the damaged shelf out of 1/2" plywood.
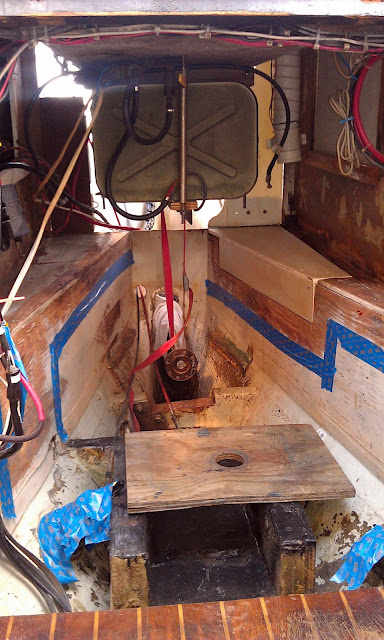 |
| Test fit for shelf repair and prep for fiberglass |
The base of the shelves are tabbed to the hull with fiberglass mat. Above the hull joint, bronze ring nails secured the joinery work in this part of C'est la Vie. I'm using 4" wide fiberglass mat to secure the battery shelf repair so why not reinforce all the joints in the area with strip of mat. This will make the entire assembly much stronger and hopefully add additional structural integrity to our already stout hull.
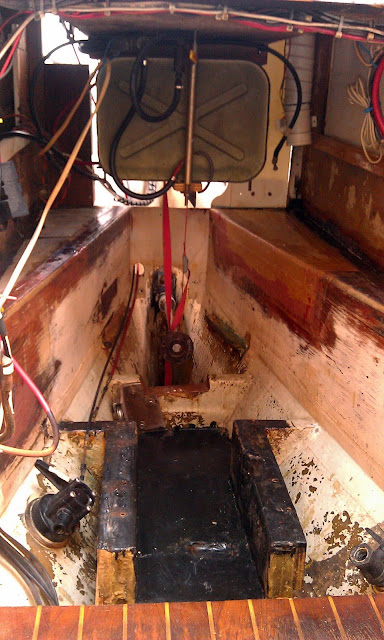 |
| Along with the shelf repair the inside corners and outside corners of the shelves are now reinforced with fiberglass mat. |
The next phase, sanding the lower engine compartment and bilge, put my meager contortionist skills to the the test. I'm certain a future of squeezing into tiny boxes or passing my body through the head of a tennis racket is not in my future, but after hours of twisting and grunting the area is ready for a coat of primer.
 |
| The depths of the bilge with one coat of primer |
To say I am pleased with the results would be an understatement. From replacing anchor rollers at the bow to varnishing the oar on the autopilot at the stern, almost every facet of C'est la Vie has received some attention during our seven years of ownership. The exception was the engine compartment and bilge. The daunting task of removing the engine to access the area proved too great a hurtle. Now we have moved beyond the hurtle and I am pleased.
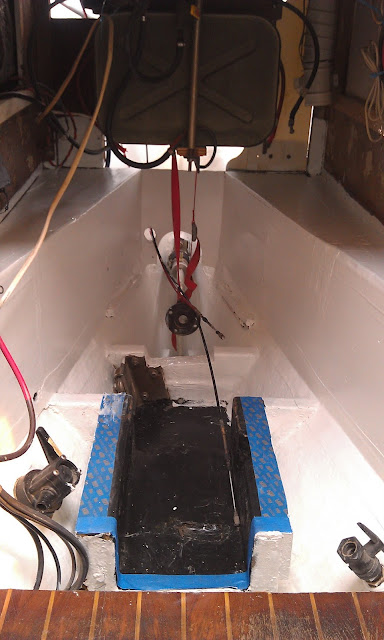 |
| The engine compartment with two coats of primer |
Two coats of primer are done. Two coats of bilge paint are forecast. The next step will be to install new sound proofing panels on the walls.
Additional images of the progress are available via a web album dedicated to this project. Here is the link to the album:
Haul Engine - Fall 2012


This comment has been removed by the author.
ReplyDeletehmm, I posted a comment but it showed up twice so I deleted one of them, but now both are gone.
ReplyDeleteI was saying wow the engine room is looking great! What kind of paint and primer are you using for the bilge? I need to repaint the insides of the interior lockers and cabinets in our boat and am afraid to use actual bilge kote because it is so unforgiving (won't dry) to mistakes.
I need a paint that will go over remaining dirt/grease/grim as I know no matter how much I clean I'll never it get it perfect.
Any advice?
Dani,
ReplyDeleteOdd you should reference Bilge Kote as I just applied the first coat to my engine compartment project today. I'm curious about your issues with the coating and any pitfalls for which I should be weary. Thus far I have...
1) degreased the area
2) washed it down with TSP
3) rinsed copiously
4) sanded area with 80 grit paper
5) wiped area down with Interlux 333
6} applied one coat of Interlux Primer
7) repeat steps 4 - 6 using 220 grit paper this time around
8) sand with 220 grit paper
9) wipe down with Interlux 333
10) apply first coat of BilgeKote
My hope is the tomorrow I can repeat steps 8-10 and be done. Thus far no issues with the process. What was your experience?
I've successfully painted many of C'est la Vie's internal lockers using Kilz latex primer and a high quality, semi- gloss, exterior, latex house paint. This process is less expensive and requires much less exposure to harsh chemicals. I switched to Bilge Kote for this project thinking the product may better handle the harsh environment of the bilge.
Per the dirt/grease/grim, are you washing the area with Tri-sodium Phospahte (TSP)? It is an aggressive soap the does wonders. It is available at any hardware store typically around the paint department. I typically go for the power type and loosely follow the instructions for mixing it into warm water. I've been amazed at what a stiff bristle brush and some TSP can accomplish.
Hope this helps - please let me know.
P.S. Recently I had the same issue with a comment appearing twice and the deleting one to discover I deleted both instances of the comment. I received both your deleted comment and existing comment as an email. I have no idea whats is up. I'm sure Google is address the issue soon.
Jeff
Thanks for getting back to me so quick. When we did the engine room and bilge we just cleaned with degreaser and didn't sand. We did clean the heck out of it though! I imagine your attention to detail and cleaning it right will make the bilge kote work much better for you.
ReplyDeleteI found when areas weren't completely dry, like the bilge covers, the bilge kote never actually dried and can still wipe off to this day over a year later.
I haven't tried cleaning with TSP although when I repaint the cabinets I will definitely try this, thanks for the suggestion. I think I will go with a primer and exterior paint as you and many others have for inside the lockers. My bad experience with Bilge Kote (due to my lack of proper preparation) makes me not want to chance it for the lockers.
Good luck tomorrow.
Dani,
DeleteRains have prevented me from applying the second coat of bilge kote. My initial coat dried properly with the exception of one half dollar coin sized spot along the port side engine bed. This area is where the spout of the pump for the oil sump typically resides. My guess is that I did not eliminate all the oil residue from the fiberglass substrate and it is now effecting the bilge kote paint. The odd thing is that the Interlux Primer appeared to coat the area. It was not until a add the bilge kote atop two layers of primer that the problem appeared.
The area effected is small and out of the way so I plan to continue on with the second coat of bilge kote. The rest of the bilge and engine compartment looks amazing.
I believe that you will be pleased with the results in the lockers using quality latex house paints. I need to paint our lazurette next and plan to return to latex paints for that project. From my experience additional cost and exposure to nasty chemicals involved in using bilge kote is only worth it areas that are high wear or are exposed to frequent immersion.
Let me know how your lockers turn out.
Jeff